
Last Updated: November 3, 2026
Quick Summary
Traditional Japanese sushi making relies on three disciplined stages: washing and soaking short-grain rice, seasoning it with vinegar while warm, and shaping each piece by hand with gentle, even pressure. Traditional sushi making also demands cold-chain fish handling and a sharp knife drawn, not chopped, through each cut.
- Rinse rice until water runs almost clear, then soak it for around 30 minutes before cooking.
- Never chill seasoned rice in the fridge, because cold rice turns hard and breaks when shaped.
- Keep raw fish between 0°C and 4°C and store it on the fridge’s bottom shelf in a sealed container.
- Start with hosomaki to learn pressure control before moving up to futomaki thick rolls.
- Fill and eat temaki within a minute or two of shaping, before the nori turns chewy.
Table of Contents
- Why Traditional Sushi Making Techniques Still Matter
- Traditional Sushi Rice Preparation
- Selecting and Preparing Fish and Fillings
- The Tools of the Trade: Nori, Bamboo Rolling Mat and More
- How to Roll Maki Sushi
- How to Make Nigiri Sushi
- Sushi Knife Skills
- Regional and Specialist Sushi Styles
- Troubleshooting Common Sushi Making Problems
- Book a Sushi Making Class for Your Next Event
- Frequently Asked Questions
Why Traditional Sushi Making Techniques Still Matter
Traditional Japanese sushi making techniques are the disciplined set of methods for preparing seasoned rice, sourcing and curing fish, and shaping each piece by hand that Japanese chefs have refined over centuries. At Sushi Queen, we teach these methods because they are what separate memorable sushi from supermarket trays.
Here is the part most guides get wrong. They treat tradition as decoration, a story to tell while you roll. It is not. Every traditional step exists to solve a practical problem, usually temperature, moisture, or hygiene. Skip the step and the problem returns, just later and at the table.
Below, we break down each stage of traditional sushi making, with the visual checkpoints and troubleshooting notes that beginner guides often leave out. Work through them in order and you will notice the difference by your second batch.
Traditional Sushi Rice Preparation
Sushi rice, called shari, is short-grain rice cooked, cooled, and seasoned with rice vinegar, sugar, and salt. It is the foundation of every style we teach, and it is where most home attempts fail. Get the rice right and even clumsy rolling produces something worth eating.
Washing, Soaking and the Absorption Method
Rinse the rice in cold water, swirling gently with your fingers, and change the water until it runs almost clear. This removes surface starch that makes rice gluey. Then soak the drained rice in fresh water for around 30 minutes so the grains hydrate evenly before cooking.
Cook by the absorption method: bring rice and water to a boil in a heavy pan with a tight lid, reduce the heat, and let the rice absorb everything without stirring. For practical detail on cooking sushi rice, including traditional cookware, see rice cookers and how to prepare sushi rice. Resist lifting the lid. Once the water is gone, rest the pan off the heat for ten minutes, still covered. guidance on safe rice storage and reheating is worth reading, because cooked rice is a food-safety risk if left warm.
Seasoning and Cooling the Rice
Spread the hot rice into a wide, shallow bowl, ideally wooden. Sprinkle seasoned rice vinegar over it and fold gently with a rice paddle, cutting through the rice rather than stirring it. A fan or a cool room helps the rice reach body temperature quickly, which is when it handles best.
Watch out: never chill seasoned rice in the fridge. Cold rice turns hard and the grains break when you shape them. Aim for rice that feels warm to the touch and holds together when squeezed, then falls apart on the tongue.
Selecting and Preparing Fish and Fillings
Fish selection is where home cooks have the least guidance and the most to gain. Most guides say ‘buy fresh fish’ and stop there. The traditional discipline is really about three things: knowing which species are suitable for raw consumption, keeping the cold chain unbroken from supplier to slicing board, and preventing cross-contamination once the fish is in your kitchen.
Sourcing Fish for Raw Consumption
In the UK, ‘sashimi-grade’ is not a legally defined term, so a label alone tells you little. What matters is the supplier’s chain: ask whether the fish was frozen at the correct temperature for the correct time, how it was transported, and whether it was handled separately from cooked produce. A reputable fishmonger will answer these questions without hesitation. A common pattern is that fish sold for raw consumption has been frozen to a temperature that kills parasites, then thawed under controlled conditions, ask your supplier to confirm this.
Freshness cues are useful but not sufficient on their own: clear eyes, firm springy flesh, a clean sea smell rather than a sharp ammonia one, and no gaping along the fillet. For oily fish such as mackerel, freshness matters even more because oils turn quickly. Lean white fish and tuna are more forgiving but still demand cold handling.
Cold Storage and Cross-Contamination
Keep raw fish between 0°C and 4°C from shop to kitchen, and use a cool bag for the journey home. In the fridge, store it on the bottom shelf in a sealed container so any drip cannot reach ready-to-eat food. Use a separate board and knife for raw fish, or wash and disinfect them thoroughly before preparing anything else. Never leave raw fish at room temperature for more than a few minutes while you slice.
Watch out: do not prepare raw fish hours ahead and leave it out. Slice only what you will serve, keep the rest refrigerated, and discard any fish that has been sitting warm. The Food Standards Agency publishes guidance on chilling and cross-contamination that is worth reading before your first raw-fish session.
Fillings Beyond Raw Fish
Think in two groups: raw fish for sashimi-style toppings, and cooked, cured, or pickled items such as prawns, tamagoyaki (rolled omelette), cucumber, and pickled daikon. Vegetarian rolls work beautifully with avocado, cucumber, and pickled daikon, and they remove the raw-fish safety burden entirely for beginners. If you want a fuller reference on the ingredients themselves, traditional Japanese sushi ingredients
A practical rule: prepare cooked and vegetable fillings first, then raw fish last, so the raw fish spends the minimum time out of the fridge. That sequencing is a traditional kitchen habit as much as a safety one.
The Tools of the Trade: Nori, Bamboo Rolling Mat and More
Authentic sushi needs surprisingly little equipment: a sharp knife, a bamboo rolling mat, a rice paddle, and a wide bowl. Nori, the toasted seaweed sheets, should be dark, crisp, and shiny, with no damp patches. Store nori sealed and dry, because it softens fast in a steamy kitchen.
A bamboo rolling mat, the makisu, gives you even pressure along the length of the roll. Wrap it in a clean bag for hygiene and easier cleaning. A damp cloth for your hands matters as much as any tool: wet fingers stop rice sticking to you instead of the nori.
- Bamboo rolling mat for maki and hand rolls
- Sharp knife, ideally a long single-bevel blade
- Rice paddle and wide shallow bowl
- Clean damp cloth for hands and blade
- Crisp nori sheets stored airtight
How to Roll Maki Sushi
Maki sushi is nori wrapped around seasoned rice and fillings, rolled with a bamboo mat into a cylinder and sliced. The method rewards even pressure over speed.
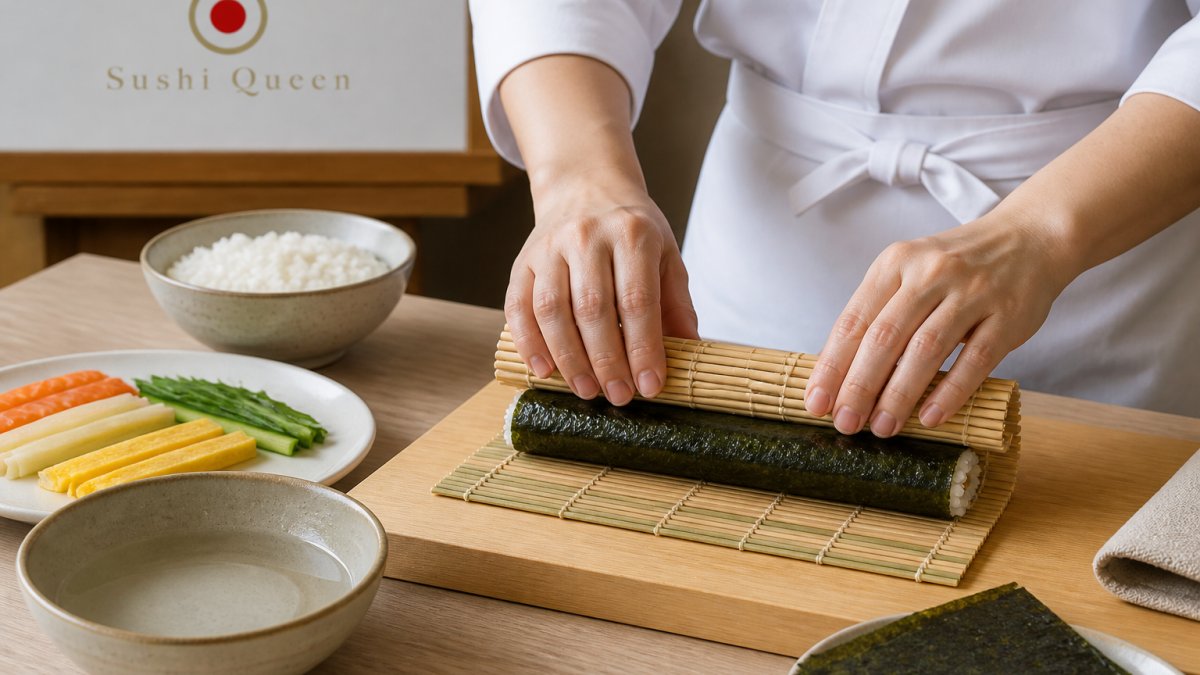
The tightness checkpoint: your finished roll should feel firm but give slightly when squeezed. Too loose and it collapses on slicing; too tight and the rice compresses into a dense bar. For video demonstrations of rolling technique, our sushi making tips videos show the motion better than any description.
Hosomaki and Futomaki: Thin Rolls and Thick Rolls
Hosomaki are thin rolls with a single filling, usually cucumber, tuna, or pickled daikon, cut into narrow cylinders. Futomaki are thick rolls holding several fillings at once, and they are less forgiving: too much filling and the nori splits. Start with hosomaki to learn pressure control, then move up to futomaki once your rolls hold their shape.
How to Make Nigiri Sushi
Nigiri is a hand-pressed mound of seasoned rice topped with a slice of fish. Shaping it well is the clearest test of technique, and it takes practice. Wet your hands lightly, take a small amount of rice, and form it into a loose oval in your palm with gentle pressure from your fingers, not a squeeze.
Lay the fish slice over the rice, press once along the top, and turn it so the fish faces the diner. The visual checkpoint: the rice should look like separate grains, not a paste, and the piece should hold together when picked up but feel airy. A common mistake is overworking the rice. Three or four gentle presses beat ten firm ones.
Sushi Knife Skills
Knife work decides whether your rolls look clean or crushed. A sharp blade, a damp edge, and a drawing motion, not a chopping one, are the essentials. For slicing rolls, wet the blade and draw it through in one smooth push and pull, letting the blade do the work. Wipe and re-wet between cuts.
For fish, slice against the grain in single, confident strokes rather than sawing back and forth, which tears the flesh. The blade should be long enough to complete each cut in one motion. Our sushi knife skills videos demonstrate filleting and slicing at full speed, which is far easier to copy than written steps.
Regional and Specialist Sushi Styles
Sushi is not one dish, and the techniques differ because the problems differ. Understanding the styles, and how they developed, explains why a pressed roll rewards patience while a hand roll rewards speed. The same attention to how ingredients respond to pressure and timing connects sushi craft with classical cooking techniques, even when the traditions take different forms.
From Preservation to Modern Sushi
The oldest form, narezushi, was a preservation method rather than a meal: fish was salted and packed with cooked rice, and the rice fermented over months to create an acidic environment that kept the fish edible. The rice was often discarded and the fish eaten. Over centuries, cooks learned to shorten the fermentation and eventually to add vinegar to the rice directly, which is the ancestor of modern shari. That shift, from fermentation to seasoning, is the single most important development in sushi history, and it is why vinegar is the backbone of every style we teach.
Pressed Sushi: Hakozushi and Oshizushi
Hakozushi is built in a wooden box (a hako) lined with nori or bamboo leaves, layered with rice and fillings, then pressed with a weighted lid and cut into blocks. Oshizushi follows the same principle with a different mould. The method rewards patience and even weight rather than hand speed, which makes it far easier to master at home than it looks. The visual checkpoint: the finished block should hold a clean edge when cut, with rice grains still distinct rather than crushed into a paste.
Hand Rolls: Temaki
Temaki is a cone of nori filled with rice and fillings, shaped by hand at the counter. It rewards speed because the nori softens quickly once it touches the rice, a hand roll assembled too early turns chewy. The traditional cue is to fill and eat within a minute or two of shaping.
Thin and Thick Rolls: Hosomaki and Futomaki
Hosomaki are thin rolls with a single filling, usually cucumber, tuna, or pickled daikon, cut into narrow cylinders. Futomaki are thick rolls holding several fillings at once, and they are less forgiving: too much filling and the nori splits. Start with hosomaki to learn pressure control, then move up to futomaki once your rolls hold their shape.
Why the Styles Matter
Knowing these styles helps you understand why techniques differ. Pressed sushi rewards patience and weight; hand rolls reward speed; thin rolls reward pressure control. We teach all of these in our classes, and each one trains a different part of your hands.
Troubleshooting Common Sushi Making Problems
Most problems at home trace back to rice or pressure, and both are fixable.
| Problem | Likely cause | Fix |
|---|---|---|
| Rolls split when slicing | Too much filling or a dry blade | Reduce filling, wet the knife between cuts |
| Rice falls apart in nigiri | Rice too cold or under-seasoned | Use body-temperature rice and fold in vinegar fully |
| Roll collapses on cutting | Rolled too loosely | Apply firmer, even pressure while rolling |
| Nori turns chewy | Roll assembled too early | Roll close to serving time |
| Rice tastes flat | Vinegar under-seasoned | Season while rice is hot, then taste |
| Fish smells strong | Poor freshness or warm storage | Buy from a trusted supplier, keep it cold |
Two more checks worth knowing. If your rice sticks to your hands, your hands are not damp enough. If your nori cracks as you roll, it has absorbed moisture and needs replacing.
Book a Sushi Making Class for Your Next Event
Reading technique only takes you so far. The step from competent to confident comes from having a chef watch your hands and correct your pressure in real time, which is exactly what we do at Sushi Queen.
For a celebration, a team-building session, or a private dinner, explore our sushi making classes in London or our group master sushi classes and Japanese cooking courses. Founder Keiko brings the traditions of Nagasaki to every session, and the business has over a decade of experience in London catering and events, and has been featured on UK TV Channel 4’s ‘The Food Chain’.
Traditional sushi making rewards patience more than equipment, and the gap between a good roll and a great one usually comes down to rice temperature and hand pressure. If you would rather learn those skills directly from a chef than troubleshoot alone, Sushi Queen can help.
Frequently Asked Questions
What are the traditional techniques used to make sushi?
Traditional sushi making rests on four core skills: preparing seasoned sushi rice with short-grain rice and rice vinegar, selecting and slicing fish correctly, shaping nigiri by hand, and rolling maki with a bamboo mat. Each step has precise cues, from the rice-to-water ratio to the angle of the knife. Mastering these fundamentals is what separates authentic sushi from a quick imitation, and they are the same techniques taught in professional kitchens.
How do you prepare sushi rice the traditional way?
Rinse short-grain rice under cold water until it runs clear, then soak it for around 30 minutes before cooking by the absorption method. Use a rice-to-water ratio of roughly 1:1.1. Once cooked, spread the rice into a wide bowl and fold through sushi vinegar made from rice vinegar, sugar and salt while fanning it to cool. The rice should be glossy, slightly sticky and served at body temperature, not chilled.
How do you roll maki sushi without it falling apart?
Keep your hands and knife damp, and do not overfill the roll. Place nori on the bamboo mat, spread a thin, even layer of rice, add fillings in a line, then roll firmly while tucking the edge. Apply gentle pressure along the whole roll to seal it. Cut with a sharp, wet knife using a push-and-pull motion rather than pressing down, which prevents the roll from crushing or unravelling.
What is the difference between nigiri, maki and temaki?
Nigiri is a hand-pressed mound of seasoned rice topped with a slice of fish or other ingredient. Maki is rice and fillings rolled inside nori using a bamboo mat, then sliced into pieces. Temaki is a hand roll, where nori is shaped into a cone and filled, eaten immediately without slicing. Each style demands different hand technique, but all rely on well-prepared sushi rice and careful fish handling.
Which fish and other ingredients are suitable for homemade sushi?
Use fish that has been frozen to the correct specification or bought from a reputable supplier who can confirm it is suitable for raw consumption. Salmon, tuna and yellowtail are common choices. For cooked or vegetarian options, try prawns, crab, avocado, cucumber, pickled daikon or tamago. Always keep raw fish chilled, handle it with clean hands and separate boards, and use it promptly to maintain food safety.
What are common mistakes when making sushi?
The most frequent errors are using the wrong rice, overcooking it, or letting it go cold before shaping. Overfilling maki causes rolls to burst, and a blunt knife crushes the nori instead of slicing it. Skipping the damp-hands step makes rice stick everywhere. Rushing the shaping of nigiri produces dense, heavy pieces. Slowing down and focusing on each stage, especially rice preparation, fixes most problems.
